


Priya Nandakumar, Staff Writer.
You own more brushes than you think. Open the mug on the bathroom counter or the roll tucked in a drawer and count: a fluffy one for powder, a flat one that came free with an eyeshadow palette, two or three fat round ones you bought during a Sephora haul and never quite figured out. Most of them get used wrong, or not at all, while the compact at the bottom of your bag wears down to nothing.
Here is the useful fact to start with: the angle and pressure of a brush change a product’s finish more than the brush’s price does. A $6 drugstore blush brush used with a light hand and a circular motion can look more expensive than a $40 one dragged across the cheek in one hard stripe. Technique is the variable readers can actually control, so that is what this piece is about: getting more out of the tools already sitting on your counter, not buying new ones.
- Pressure matters more than price: a light, circular touch with any brush deposits product more evenly than a heavy hand with a premium one.
- Clean brushes change color payoff: oil and old product buildup can visibly dull pigment and cause patchiness within two weeks of regular use.
- One brush, several jobs: most routines need four or five brush shapes, not fifteen, once you learn which shape does which job.
Why The Same Brush Looks Different On Different Days

A brush is a delivery system, not a magic wand. Think of it the way you’d think of a paint roller: the roller does not decide how much paint ends up on the wall, your arm does. Load it too heavy and you get streaks. Load it light and build up in thin layers and the color sits evenly.
The same logic governs a powder brush loaded with bronzer or a flat brush pressed into concealer. Humidity changes things too. On a humid East Coast summer day, powder products grip the skin faster and can look patchier if applied in one heavy pass, while dry winter air with indoor heating can make the same brush feel like it is “dragging” product rather than laying it down. Neither problem is the brush’s fault.
A quick self-test: tap your brush against the back of your hand after loading it with powder product. If a visible cloud of color puffs off, you have too much on the bristles. Tap until the color looks almost too light, then build it on the face in two thin layers rather than one heavy one. This single habit fixes more makeup complaints than any new purchase would.
Matching Brush Shape To The Job It Was Actually Built For
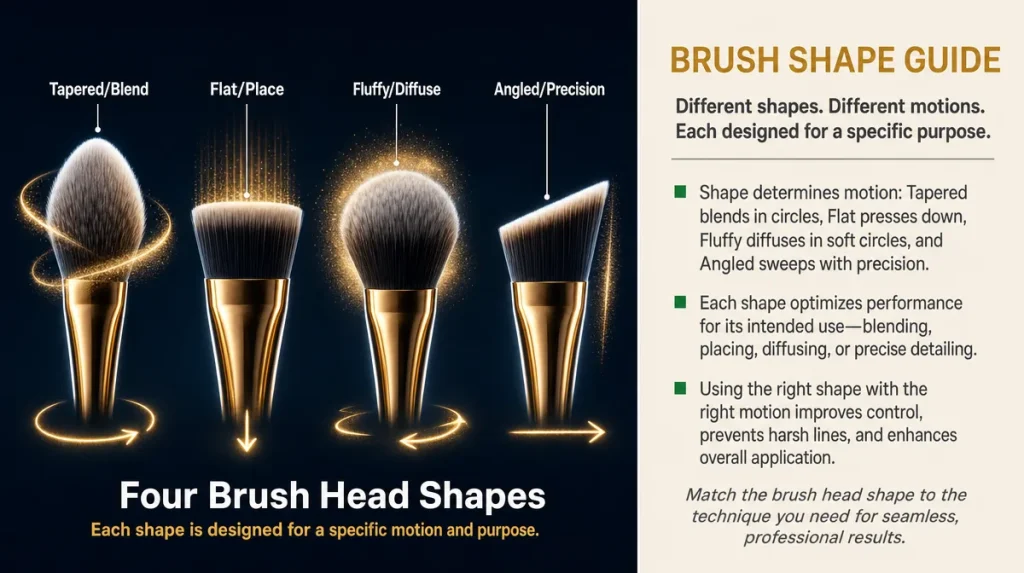
Brush sets are usually sold as a bundle, which means half the shapes in the roll solve problems you don’t have. Learning four shapes covers most of a routine.
A tapered or domed brush, rounded and slightly pointed, is built for blending edges: eyeshadow crease work, softening concealer lines. A flat, dense brush is built for placement: foundation, concealer, cream contour, anywhere you want product to stay exactly where you put it rather than spread. A fluffy, airy brush is built for diffusion: setting powder, highlighter, the final pass that blurs everything together. A small angled brush is built for precision: brow powder, eyeliner from a cream pot, the inner corner of the eye.
The mistake most people make is using a diffusing brush to place product and a placement brush to blend it. It is the equivalent of trying to spread butter with a fork and spackle a wall with a butter knife: both tools work, neither works well for that specific job. Lay your set out and sort it into those four piles before your next full face. You will likely find you already own at least one of each, buried among duplicates you don’t need.
The Clean-brush Habit Nobody Wants To Do, And Why It Actually Shows Up On Your Face
Dirty brushes do not just carry bacteria, though they do that too. They carry oxidized oil and old pigment that mutes new color. A fluffy blush brush used daily for three weeks without a wash is coated in a thin film that acts like a layer of wax between fresh pigment and your skin.
The American Academy of Dermatology’s general skin care guidance recommends washing makeup tools regularly as part of basic hygiene, both for skin health and for product performance. A practical rhythm that fits most routines: brushes used around the eyes weekly, brushes used on the rest of the face every one to two weeks. A mild shampoo or a dedicated brush cleanser, lukewarm water, bristles pointed downward so water doesn’t loosen the glue in the handle. Laid flat to dry, never standing upright in a cup while wet.
A simple self-test: swipe a clean cotton round across the bristles of a brush you use often. If it leaves behind a gray or tan smudge, that brush is overdue. Readers often report their foundation looking “off” by midweek and blame the formula, when a two-week-old buildup on the brush is the more likely culprit.
Finding The Right Amount Of Pressure For Your Skin Type
Oily, dry and combination skin all respond differently to the same brush. On oilier skin, a heavier hand with powder products can look cakey by midday because oil resurfaces and mixes with the product sitting on top. On drier skin, the same heavy hand can look patchy immediately because there isn’t enough natural moisture underneath to let powder melt in.
The fix in both cases is the same light-pressure, thin-layer approach, but the number of layers differs. Oilier skin often does better with one thin layer and a blotting step rather than reapplying more product to fix shine, since more powder on top of oil tends to look worse, not better. Drier skin often benefits from a cream or liquid product applied with a dense brush before any powder touches the face at all, since powder has very little to grip onto on a dry surface.
A useful habit borrowed from professional makeup artists: apply with a slightly damp brush when working with powder products on drier skin. A barely damp brush, almost dry to the touch, helps powder adhere more like a cream and reduces the chalky look some people get in winter months when indoor heating pulls moisture from the skin.
The Blending Motion That Fixes Harsh Lines
Hard edges, whether at the jawline from foundation or at the crease from eyeshadow, almost always come from a back-and-forth scrubbing motion. Scrubbing pushes product into a line instead of spreading it.
A circular, buffing motion works better for cream and liquid products on the face: small, overlapping circles that move the product outward from where it was placed, never in a single straight direction. For powder products in the crease of the eye, a windshield-wiper motion, back and forth in a narrow arc rather than side to side across the whole lid, keeps color contained and soft at the edges.
The mistake to watch for is blending only at the very end. Waiting until a full face of color is applied and then trying to blend everything at once usually just moves harsh lines around rather than removing them. Blend as you go, after each step, while the product is still workable. A 10 second self-test: after your next blush application, run a finger along the edge of where the color meets bare skin. If you can feel a ridge or see a visible line in a mirror under daylight, that edge needs another pass with a clean, dry brush before moving on.
Reading Labels Without Falling For Marketing Language
Brush packaging leans on words like “professional,” “luxury” and “cruelty-free vegan fiber” as if they describe performance, when most describe sourcing or branding instead. None of those words tell you how densely the bristles are packed, which is the detail that actually predicts how a brush performs.
A densely packed brush, where you cannot easily see the metal ferrule (the little metal band that holds the bristles) through the hairs, will generally give more opaque, controlled product placement. A loosely packed brush, where you can see daylight between bristle clusters, will generally give a softer, more diffused result, which is desirable for setting powder and undesirable for foundation.
Synthetic versus natural bristle matters less for most tasks than packaging suggests. Synthetic bristles tend to work better with liquid and cream formulas because they don’t absorb product the way natural hair does, while natural bristles can pick up and distribute loose powder a bit more softly. Either can do either job reasonably well. Before buying anything new, readers are better served fanning out the bristles of brushes they already own under a bright light and checking density, rather than trusting a word on the package.
Matching Tools To Lighting, Not Just To Your Face
A brush and a finish that look perfect under bathroom lighting can look entirely different under office fluorescents or outdoor daylight. Bathroom lighting is often warm and flattering in a way that hides unevenness; daylight is unforgiving and shows texture, patchiness and color mismatch instantly.
A practical routine: do a final check near a window or in natural light before leaving the house, not just under the bathroom vanity bulb. This is also the best setting for judging whether a foundation or concealer shade truly matches skin tone, since undertone (the warm, cool or neutral cast beneath the skin’s surface, read in daylight rather than indoor bulbs) is notoriously hard to judge under artificial light. Many return and exchange issues at the counter trace back to a shade picked under store lighting that looked different by the time the customer got outside.
For evening events under warmer, dimmer lighting, a slightly more diffused application, meaning a fluffier brush and a lighter hand, tends to photograph and read better than the fully matte, precise finish that looks good under office lights. Matching the tool and technique to where you’ll actually be seen, rather than to where you’re applying it, closes a gap a lot of readers don’t think to check.
Key Takeaways
Technique, not spending, is the lever most readers can pull immediately. A light hand, a clean brush and the right shape for the job will outperform an expensive new set used the old way.
Give the habits in this piece two weeks before judging results. Brush technique is muscle memory, and the first few applications after changing your pressure or motion can feel unfamiliar even when the mirror shows improvement.
A Quick Checklist Before Your Next Full Face
- Tap off excess product before applying, especially with powder.
- Sort your brushes into four jobs: blend, place, diffuse, precision.
- Wash eye brushes weekly, face brushes every one to two weeks.
- Use circular motions for cream and liquid, arc motions for powder in the crease.
- Blend as you go, not only at the end.
- Check density by fanning bristles under bright light rather than trusting package language.
- Do a final shade and finish check in daylight, not just bathroom lighting.
This article is for general information and does not replace individual professional advice.
Individual results from technique changes vary by skin type and product.